GOV.UK Notify is hosted on the GOV.UK Platform as a Service (PaaS). The PaaS is being retired, so we are migrating all of our infrastructure into our own Amazon Web Services (AWS) account. This blog post explains how we migrated our PostgreSQL database with minimal downtime.
Migrating our database
The PaaS provides a database for us and we use it to store all of our data - from data about each notification we send to the content of the hundreds of thousands of templates service teams use to send those notifications. This is an AWS RDS PostgreSQL database and it lives in the PaaS’ AWS account. Our apps that run in the PaaS talk to this database. We are going to call this database our ‘source database’.
We needed to set up a new database in our own AWS account, and get all of our apps to talk to the new database. We are going to call this new database our ‘target database’.
Creating a new PostgreSQL database in our own AWS account is not too difficult. The hard part is transferring all of our data and getting our apps to use this new database, whilst incurring minimal downtime.
A bit more about our source database
Our source database is about 400GB in size. It has about 1.3 billion rows, 85 tables, 185 indexes and 120 foreign keys. It is PostgreSQL version 11.
On a usual weekday, we do somewhere in the region of 1,000 inserts or updates per second (sometimes much lower, sometimes much higher), plus a similar number of reads.
GOV.UK Notify sends millions of important and timely notifications each day, from flood alerts to updating users about their passport applications . Every notification we send requires talking to our database. Therefore it’s important that we minimise any downtime.
AWS Database Migration Service
The PaaS team offered us the ability to migrate databases using AWS Database Migration Service (DMS).
DMS is responsible for transferring data from our source database to our target database. It can be run in either the source or target AWS account.
DMS works by:
- Copying across all of the data, table by table, up to a specific point in time. This is known as the ‘full load’ task.
- Entering replication mode, where it ensures that all new transactions on the source database are replayed onto the target database, so that the 2 databases are in sync.
We would then be responsible for getting our apps to stop talking to the source database and start talking to the target database.
Database migration process
The database migration process was completed in several stages.
Setting up the DMS instance
In our case, the DMS instance was created in the source AWS account. We chose the source account because the PaaS team had already set up instances of DMS in their account and so were able to do this quickly and easily.
The DMS instance also needed to be given PostgreSQL credentials to talk to both the source and target database.
The DMS instance and the target database live in different virtual private clouds (VPCs). With the help of the PaaS team, we set up VPC peering so that traffic from the DMS instance in the PaaS’s VPC could be routed directly to our VPC without the traffic going over the public internet.
Setting up our target database
We created our target RDS instance in our own AWS account. PostgresSQL version 11 was about to become unsupported, so we took this opportunity to upgrade our PostgreSQL version by making our new database PostgreSQL 15.
We then took a dump of the database schema for our source database using `pg_dump`. This gave us a file with the SQL commands to recreate our database schema.
From our database schema, we took the declarations for our tables and applied these to our target database.
We didn’t apply our foreign keys at this point because DMS’ full load process doesn’t try to copy across the data in an order that matches your foreign key constraints.
We didn’t create our primary keys or indexes at this point because this would massively slow down our full load task. Each individual insert would take longer; it would need to update our indexes and this would add up to a significant amount of time when inserting billions of rows. It was much quicker to first copy all of our data across and then add the indexes afterwards.
Full load
Once we had a target database with the tables created, we then started the DMS full load task. This copies across all the data that existed when we pressed the ‘start full load’ button. It doesn’t copy across any new data or updates that come in after this point. It took about 6 hours for the full load task to finish.
After the full load task completed, we applied the remainder of our source database schema file which adds our indexes and key constraints. Adding these took about 3 hours.
Replication
Once our full load task completed, the data in our target database matched the data from the source database at the point when we started the full load task. But many new inserts, updates and deletions had happened on our source database since then. And many more changes would keep coming in too.
To copy these new changes across, we then started the DMS ongoing replication (also known as change data capture) task. This reads all the transactions from our source database transaction log that were created after the full load task began and sends them to our target database. This ensures that our target database is in sync with our source database with, at most, a small amount of lag.
It only took a couple of hours for the replication process to catch up. At that point, we monitored the latency in the DMS replication process to make sure it could handle the number of changes happening to the source database and continued to stay in sync.
We ran the DMS replication process for about 10 days in the background, keeping everything in sync whilst we awaited the time for our apps to stop talking to the source database and start talking to the target database. We had announced this time to our users in advance and so had a set time already for the migration of traffic.
Preparing to migrate traffic
Several months ago we planned how we would stop our apps talking to our source database and get them using our target database.This was the process we used:
- Stop all traffic from our apps to our source database. At this point we would enter a period of downtime where Notify was unavailable.
- Ensure our replication had caught up so that all updates to our source database had been reflected on our target database.
- Allow our apps to start talking to our target database. This would end our downtime.
It was important not to have some of our apps talking to our source database and the rest talking to our target database at the same time. If this happened any changes on our target database would not be reflected on our source database which would mean users would get inconsistent data.
We wrote a Python script for this process so it could be explicit, easily repeatable and much quicker than being done manually. The quicker it could be done, the less downtime for users of Notify. Our target was less than 5 minutes of downtime. We ended up using this script at least 40 times during our various tests and practices beforehand.
We picked a Saturday evening for the migration. This is because it is one of our quietest times without us having to be awake in the middle of the night when we won’t be as alert.
Stopping traffic to our source database
Our script would stop all traffic to our source database by calling `pg_terminate_backend` on all the connections from our apps. This took less than a second. We also changed the password for the PostgreSQL user used by our apps, meaning that if the apps attempted to reconnect to our source database they would get an authentication error.
Checking replication had caught up
DMS inserts some useful tables into our target database on the status of the replication which are updated every minute. These tables allow us to see how much lag there is between our target database and the source database. Our migration script would check these tables to make sure our target database was entirely caught up.
To be extra safe, after our apps had stopped talking to our source database, our migration script would write a single record to our source database and then wait to see that it safely arrived in our target database. This gave us extra certainty that all changes had been replicated.
Making a smooth swap of traffic
For our apps to connect to our database, they need to know the location of the database and also a username and password for a relevant PostgreSQL user. These are provided to our apps in an environment variable of the following format:
SQLALCHEMY_DATABASE_URI = postgresql://original-username:original-password@random-identifier.eu-west-1.rds.amazonaws.com:5432If we want our apps to connect to a different database, we need to update the username, password and location in the URI and redeploy our apps so this change takes effect. Redeploying our apps takes about 5 minutes. If we redeployed our apps as part of our migration script then this would mean an extra 5 minutes of downtime. To minimise downtime we made two changes in advance of our migration so that we could use a quick Domain Name System (DNS) change instead of redeploying our apps.
The first change was to create a user on both our source and target database that had the same username and password. This means that we don’t need to change the username or password provided to the apps during the migration.
The second change was to create a DNS record in AWS Route53 for `database.notifications.service.gov.uk` with a 1 second TTL (time to live). It had two records with weightings:
- 100% of DNS results were weighted to the source database location
- 0% of DNS results were weighted to the target database location
We set our URI used by our apps to use our new username and password, and to use the new domain name for the location of our database.
SQLALCHEMY_DATABASE_URI = postgresql://shared-username:shared-password@database.notifications.service.gov.uk:5432Now, when we wanted to swap the database that our apps would be pointing at, our migration script just needed to update the DNS weighting in AWS to 100% of results being sent to the target database location and wait 1 second for the TTL to expire. Then, when our apps next try to query our database they will be querying our target database.
What happened on the day
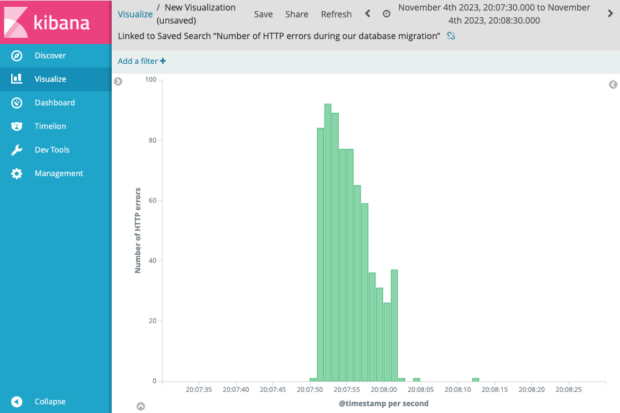
When we gathered on the evening of Saturday 4 November, we had set up our target database, the full load process had run and new transactions were being copied across. We checked and only had a couple of seconds lag between our target database and the source database.
We then successfully ran our migration script so that our apps would stop talking to our source database and start talking to our new target database. During the migration there was a short period of downtime, roughly 11 seconds. This was much less than our 5 minute target so we were very pleased and so were our users.
What we learnt
We chose to use DMS because it was well supported by the GOV.UK PaaS and we could also get support from AWS. If we were doing a PostgreSQL to PostgreSQL database migration in the future, we would invest more time in trying alternative tools such as pglogical. DMS potentially added more complexity, and an unfamiliar replication process than what we may have found with other tools. This backs up what AWS say themselves on PostgreSQL to PostgreSQL migrations.
What’s next for GOV.UK Notify’s migration to AWS
Now we’ve migrated our database, our next step is to migrate our apps. Sneak peek - we are moving them to AWS Elastic Container Service (ECS). We will blog about how this goes in the coming months.
If you’re interested in hearing about how a different team in government also migrated their database from the PaaS, then take a look at a recent blog post from the Department for Levelling Up, Housing and Communities.

14 comments
Comment by Richard posted on
Brilliant work - hope that other crucial database owners learn from the thorough work done by the team. Well done all.
Comment by Adrian posted on
Passing username and password to the database in an env variable is a bad idea from a security point of view. Start using the secret manager
Comment by David McDonald, GDS posted on
On the GOV.UK PaaS, the only way to pass secrets into our application is using environment variables. We are moving our apps into AWS Elastic Container Service and that will allow us to provide them as secrets, rather than environment variables. We’ve already done this work and it will come into effect when we migrate user traffic to our new apps.
Comment by Nikola posted on
why did you stay on AWS RDS and not move to Aurora?
Comment by David McDonald, GDS posted on
Great question! Although Aurora could have given us some additional benefits, we wanted to keep things as simple as possible in the migration to reduce the risk of breaking things, so went for like for like where possible.
We chose RDS because that is what was running in the PaaS and we tried to mimic most of their RDS configuration too. Trading off speed and reduced risk versus benefits of other new features/technologies is always a challenge.
Comment by Jurre posted on
Great work 👏
Have you also looked into AWS's managed blue/green deployments? This essentially achieves the same result as your approach but with less manual steps.
Comment by David McDonald, GDS posted on
Thanks! So I wasn’t aware of RDS Blue/Green Deployments until more recently but they look really interesting. It looks like it wouldn’t have been appropriate in this case because our source and target database were in different AWS accounts and RDS Blue/Green Deployments doesn’t support this. However, when we have to do our next major PostgreSQL upgrade (which will be in the same AWS account) I’m definitely going to look into them!
Comment by Vitaly posted on
Thank you for your in-depth post.
I'm curious if we really need manual operations like schema creation when using AWS DMS?
Comment by GDS Team posted on
Thank you for your comment. DMS does offer schema creation. We didn’t go for this as we wanted to control at what points the different bits of the schema get applied (we wanted to create our indexes after the full load task). We also wanted to validate any schema creation that DMS did. To validate this, we would compare it against the pg_dump of our existing schema. Given that we already had to export the existing schema, it was just as easy to then apply it and know it was correct than to configure DMS and validate it had done it successfully.
DMS also offers to create the database tables for you at the start of the full load task (see Target table preparation mode documentation in https://docs.aws.amazon.com/dms/latest/userguide/CHAP_Tasks.Creating.html). However this will only create the table and the primary keys - it doesn’t create foreign keys or indexes. This would mean we would still need to manually create half of our schema anyway for the keys and indexes (in which case, it ended up just being easier to create it all ourselves rather than try and work out what items DMS hadn’t created for us).
If this was not a PostgreSQL to PostgreSQL migration, then using the DMS schema conversion may have been more beneficial.
Comment by Vitaly posted on
I see.
Probably we can launch the new instance from the snapshot of the source DB instance to avoid these manual steps?
Thank you, Vitaly
Comment by David McDonald, GDS posted on
We did look into snapshots as a way of doing our migration. Because the source database is stored in a different AWS account to our target database, we would have run into problems with needing to re-encrypt our database, expose the encryption key to the source account and then transfer the snapshot. It would have ended up being quite a lot of work. Using this method, just to transfer the database schema wouldn’t have been worth it.
Comment by Vitaly posted on
I see.
Many thanks!
Comment by reader posted on
don't forget to increase the DNS TTL now that the migration has been done otherwise clients will have to do DNS queries every second
Comment by David McDonald, GDS posted on
Thanks for the reminder. We changed the DNS TTL back to our default (5 seconds) as one of the last ‘tidy up’ steps of the migration.